Painting the front porch floor has been on my list for quite some time. I was never a fan of the plain concrete floor.

Last year, I patched and painted the stucco on the foundation. It looked amazing, but it also really highlighted how “blah” the porch floor looked.


How I Stenciled a Brick Floor
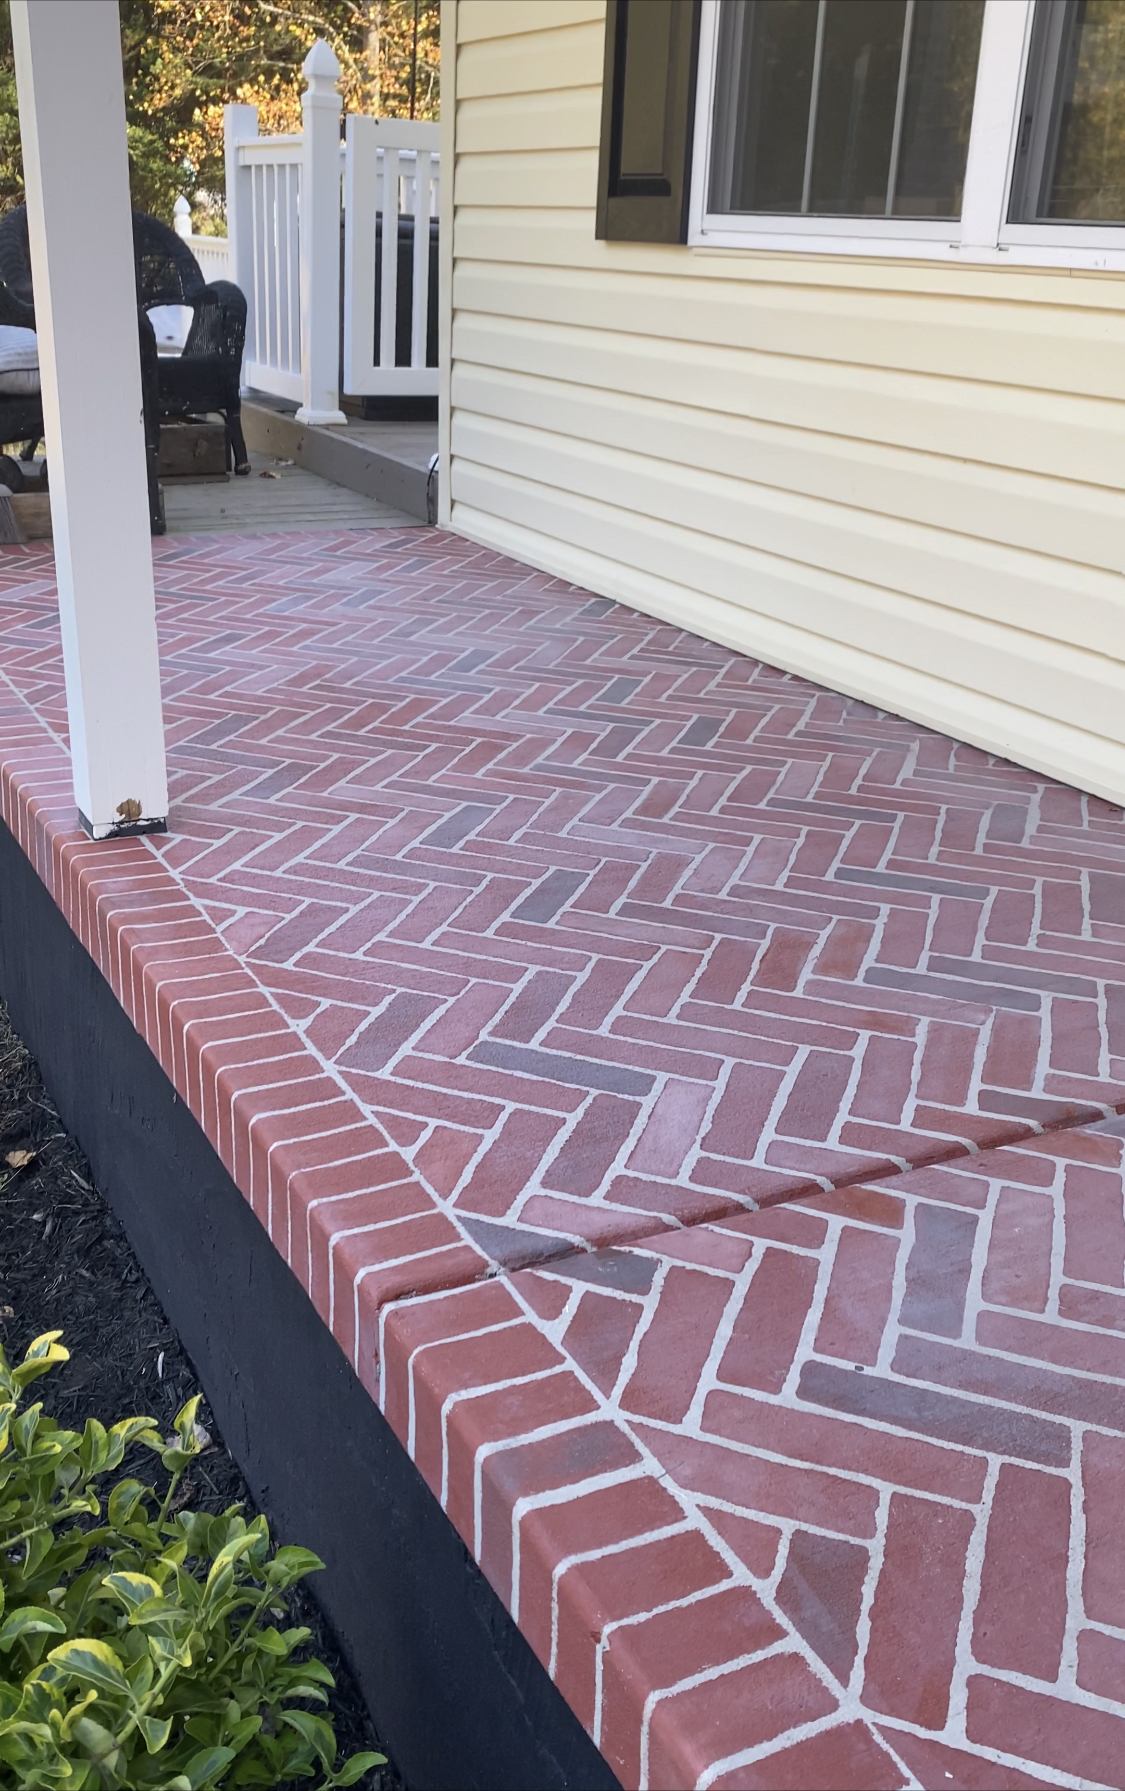
I wanted to stencil a brick pattern on the floor. I chose the herringbone pattern from Cutting Edge Stencils. Admittedly, I was nervous to use the stencil. I had never really used one before, and this was a big project to start on. But, as I like to say, it’s just paint!

I started out with the base color, which was leftover paint from our dining room (that’s since been painted over). It’s the color “calico” from the Eddie Bauer collection with Valspar. The “grout” works out to just be the original concrete color.

I rolled calico all over with a small foam roller. Then, I used some super chippy brushes to dry brush 4 additional colors randomly on different bricks. Doing this helped to add variation and make the bricks looks more authentic.
For the additional colors, I used sample jars of paint colors that I already had on hand. They were Urbane Bronze, Techno Gray, Dorian Gray, and Spicy Hue, all by Sherwin Williams

I ended up finding a particular technique that worked well with adding the additional colors. Of course, as the calico color was still wet, I would take a super chilly brush and add the slighted bit of paint on the tips. I had scrap cardboard that I would wipe any excess off onto. Then I would swipe the color lightly onto the brick shape. Once it was swiped on, I would start to buff it in a circular motion. This would really combine it with the original calico color as well as eliminate the brush strokes. I kept a water misting spray bottle handy in case any of the paint began to dry faster than I could buff, but I rarely had to use it.


As you can see above and below, the stencil had triangle markers at the top and bottom. That is how I would align the stencil to keep it spaced properly.


Similarly to hanging wallpaper, you want to make sure that the first placement is super important. It needs to be straight/level to keep the rest of the project in line.

I wanted to create a straight border of bricks along the side and front edges, so I used tape to keep a clean line.

You may notice that there was space at the top along the siding that wasn’t getting painted. That is because the big stencil didn’t fit on its own. This is what it would look like lining the stencil against the edge of the house.
“How do you fix this?” you maybe wondering… well the big stencil also comes with a little narrow stencil that you can use to fill in the gaps.
Sponge Painted Brick Border

For the boarder, I used a large sponge. It never transferred the paint perfectly where I didn’t need to fix it up with a paintbrush, but it was great for giving me the shape.

I would just eyeball the spacing, and overall it worked really well. Keep in mind that there needs to be spacing not only between the bricks, but also between the herringbone pattern and the straight boarder.

I did the same thing along the front of the lip of the porch.

The borders were truly the most tedious part of the process. It was very simple, but it took FOREVER.

Gray Wash How To
This was the final look with just the colors mentioned below. I loved it, but something wasn’t sitting right with me about it. When it comes to real bricks, I always prefer and aged or German smeared look compared to a clean, bright brick. I thought for a couple days on how I could “age” the entire porch.
A grey wash is what I came up with! I took a small amount of the Doran gray color and mixed it with water. This color happened to be nearly the same color as the “grout”, so I felt it was best for the color wash . It had to be considered that whatever color I used would also be covering the “grout”.

I used a foam roller to apply the gray wash, going first along the house, then went back to get the front. I mainly did it that way because I could crawl along the back, then walk along the front. However, it created a bit of a “line of demarcation” where it would overlap. If I were to do it again, I would go all the way from the house to the edge in one swoop to avoid this.
There were some spots by the front door that were patchy when I was finished with the gray wash. I went back the to try to fix it and ended up spilling my tray of watery paint and messed up an even bigger section!
The next day, I planned to re-stencil the whole middle section, BUT I accidentally found a better way.

First, I wanted to fix the line. I hand painted May of the bricks where I could see the line.

I went back and individually painted the gray wash onto each brick so as not to have an issue with a line again.

It worked so well that I did the same in the center section instead of using the stencil.


This is what I used to seal everything. The directions said that I could either roll it on or use a garden sprayer. I opted for the latter.

Applying it this way took no time at all. I’m pretty sure I was done in less than 10 minutes. It dries in under 2 hours and can be walked on after 24 hours.
After 24 hours I moved everything back on and got to styling.

You can see more of the porch styled for fall/Halloween here.
If you would like to see the process in video form, you can check out my Instagram stories here.