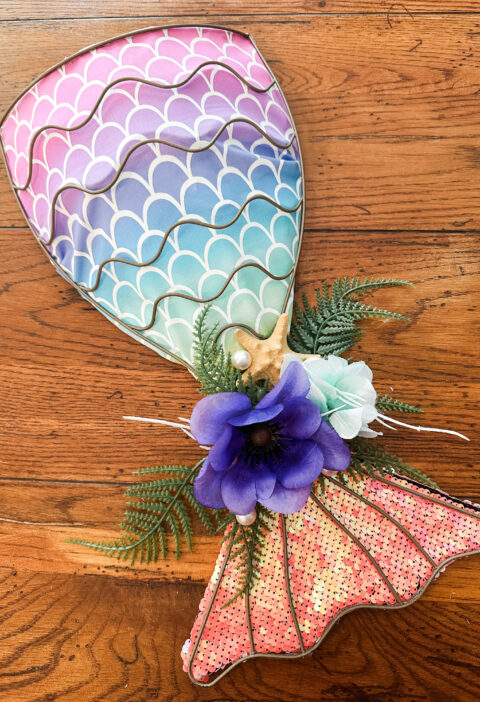
Inspired by the differently themed Minnie Ear headbands that we saw on our most recent trip Disneyworld, I wanted to create an Ariel inspired Minnie Mouse head for my daughters bedroom.

I had a vision of a gallery wall that mixed in useful pieces like a storage display for purses, sunglasses, and bows with pretty and fun items to show off her interests. She loves Minnie and the overall room theme was mermaids, so I thought combining the two would be perfect!

I searched though different Minnie Ears for Ariel themed ones and came across this one from Ear Me Up Co.

To gather supplies, I headed to Dollar Tree where I was able to find everything I needed. I was able to create my Minnie for less than $10 with all Dollar tree finds.

Supplies:
• Summer florals in purple, red, and aqua plus some green ferns and white coral
• Appetizer forks from the party section
• Hollow “rope” cord from the crafty aisle that has wreath supplies. It comes in lots of colors but I liked that the brown looked like real rope
• Faux pearls from that same aisle
• A 2 pack of small round wreath forms from, you guessed it, the wreath craft aisle
• Summer party net- I ended up not using this but I got it to “fill in” the ears
• Hot glue gun
• wire cutters
•zip ties

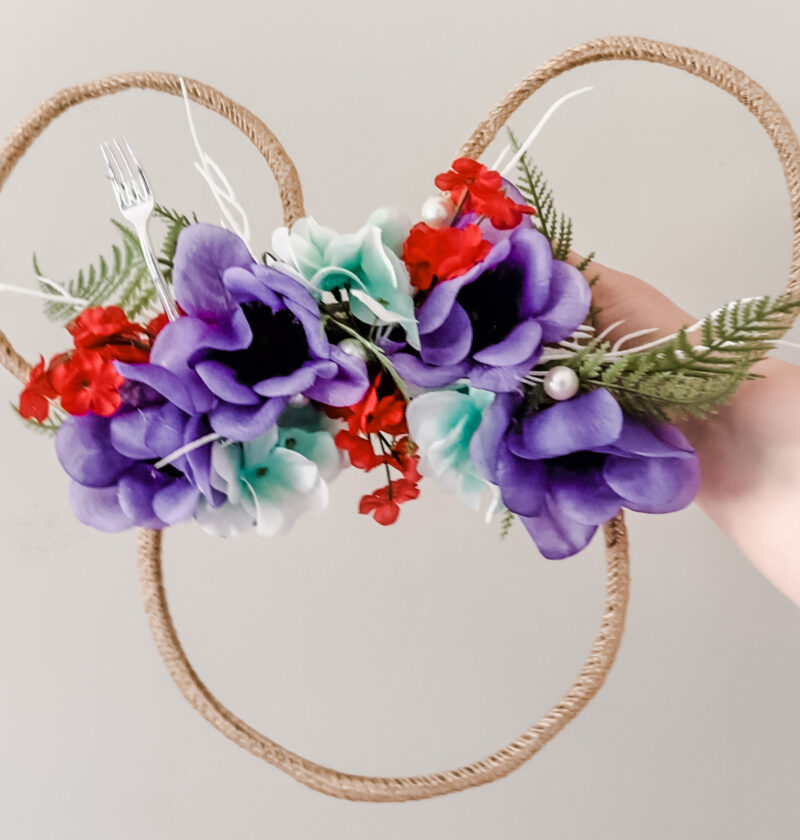
I cut part the wreath, using one of the largest layer and two of the smallest size layer.

To add on the mesh tubing, I had to cut each circle in order to thread the metal ring through until they were all covered. I secured the mesh together at the ends using hot glue.

To make the Minnie head, I layed out the ears and used zip ties to attach them. (Don’t worry, the flowers will be covering them up!)

Once the head was one piece, I started laying out the flowers to get an idea of how they’d be arranged.

It didn’t take long for me to realized I needed more surface space to attach everything to. I grabbed a small strip of cardboard and cut it to size and glued it to the back.
The cardboard ended up being how I hang it on the wall as well. It created enough of a little ledge that the picture hook can grab on to.

Next, started gluing the flowers and greenery to the form, being sure that all of the cardboard was hidden from the front view.

After the flowers were all attached, I went in with the pearls and a little fork.

This is the final look!

It looks perfect in her gallery wall!

What theme or movie would you love to see on a Minnie head? Let’s chat in the comments!